Since its launch in 2012, Google Shopping ads have had a significant effect on the eCommerce industry and the way we shop online. According to Shopify, over 60% of its retailers’ paid clicks come from shopping ads. This platform consistently delivers some of the highest returns on ad spend of any paid channel, and it’s only expected to grow in the coming years. The main thing that makes shopping ads so efficient is the high intent of the users exposed to them. But building an effective campaign does require tools, knowledge, structure, and optimization.
In this Google shopping ads guide, we will walk you through how the platform works, and what are the best ways to leverage them to grow brand awareness and revenue.
What are Google shopping ads and how they work
Simply put, shopping ads are the products that appear on top of the page, above the SERPs.
How do they differ from ‘regular’ Google ads? Shopping Ads are based on your Google Shopping feed instead of keyword bids.
As shopping ads have proved so useful for shoppers and retailers alike, Google has steadily extended their reach. Now, shopping ads also appear under the shopping tab, on search partner websites, and even on YouTube.
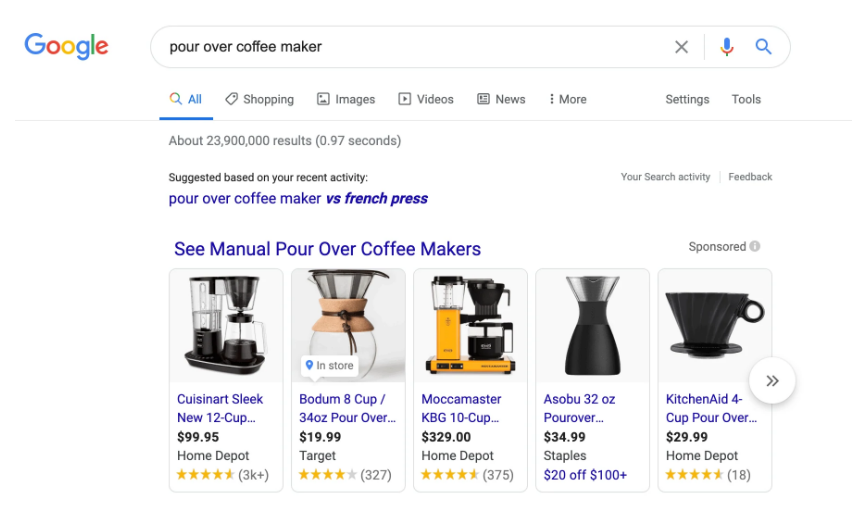
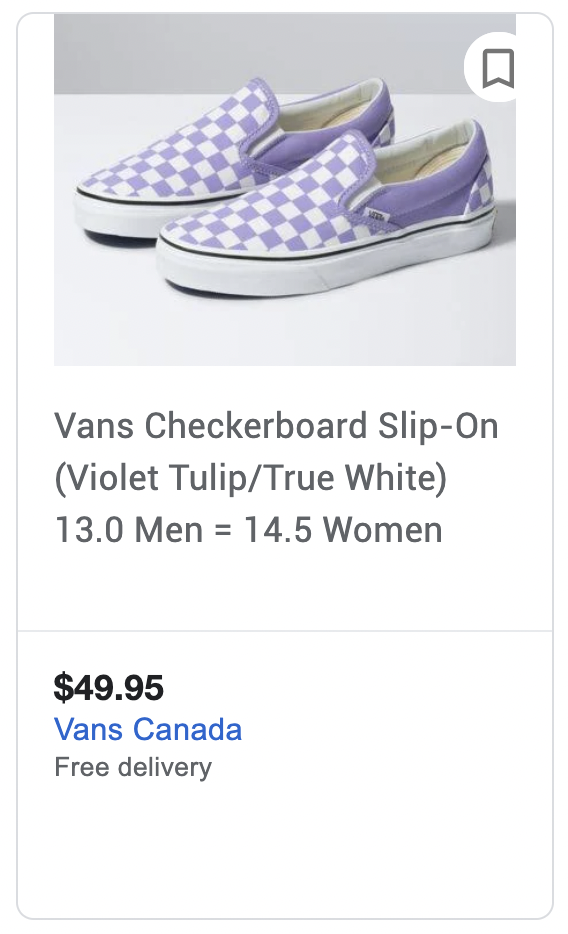
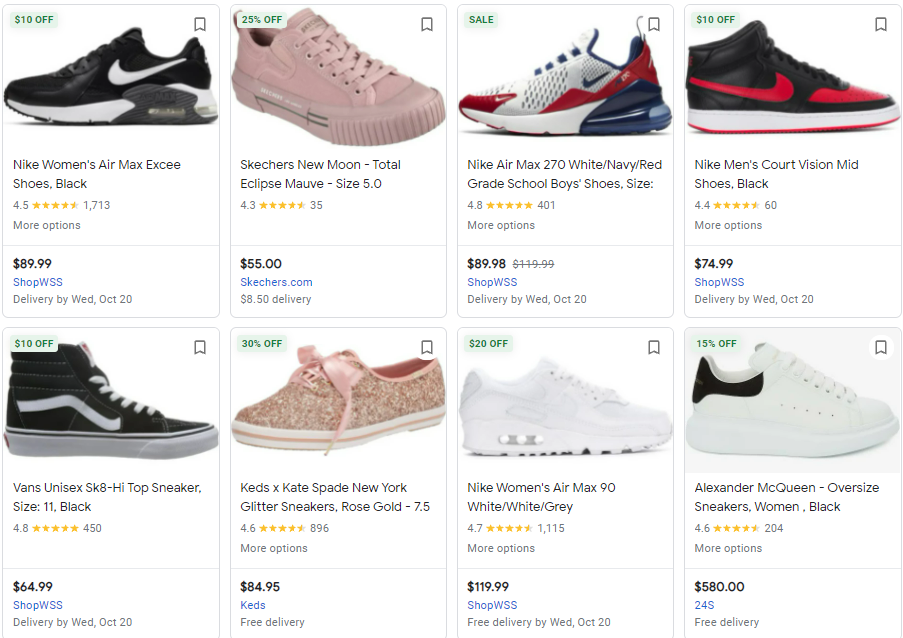
Each product listing includes the brand name/URL, price, and annotation (i.e Free Shipping, In Stock, etc.).
Shopping ads are set up and managed differently than ordinary search ads. With text ads, you create campaigns, ad groups, and ads focused around chosen keywords. These ads live within your Google Ads account and are managed through the Google Ads editor.
Shopping ad campaigns, on the other hand, are set up in Google Ads but the important data which includes the detailed product list lives within the Google Merchant Center. When you create a Shopping ad campaign, Google uses your feed, your website, and other factors to determine which search queries will trigger your ads.
This seemingly gives you a lesser sense of control compared to text ads. However, this isn’t necessarily true. It all comes down to knowing how to build a campaign structure that fits your desired level of control while still getting the best from Google. Don’t worry, we will dig into the step-by-step of setting up and optimizing shopping ads shortly.
Benefits of Google Shopping ads
There are many reasons to invest your time and money into shopping ads. Here are 4 ways this platform can benefit an eCommerce business:
Improved visibility and SEO
Google Shopping ads appear at “position 0” – above the highest ranking organic and paid search results. Organic search traffic takes a lot of time, effort, and sometimes luck to build, especially for eCommerce. Google Shopping gives you a shortcut to reaching relevant customers.
Improved lead quality
As we already mentioned, the users exposed to shopping ads are usually high intent. When they click on an ad, it’s with the intent to complete the purchase. This improves the quality of the traffic to your online store.
Boost brand awareness
Not everyone will end up clicking your ad. But even if they don’t, they still saw it and that’s something. Maybe the next time they need something they will click your ad or even go directly to your website because they remember your business.
Get to know your customers better
Google shopping offers extensive analytics about who’s clicking your ads, which product performs the best, and how your campaigns compare to competitors. This data alone is enough to make Google Shopping worthwhile.
How to Set Up Google Shopping Ads
There are two steps you must take before you can really start using Google Shopping – sign up for a Merchant Center account and verify your website.
Merchant Center is essentially the beating heart of Google Shopping. It’s where your feed lives and where you can set tax and shipping rules.
Signing up for Google Merchant is very easy. All you need to do is fill in some basic information about your business.

Once your account is created, it’s time to verify your website. This can be done in one of two ways: through an existing Google product installed on your website (i.e Google Analytics) or by adding a specific tag to your website’s code. This allows Google to make sure the store belongs to you.
After your website is verified, you will have access to all the features of the Merchant Center. Your next step is to add your products. This can be done in two ways:
Manually – If you choose this option Google will guide you step by step through manually adding all the product details. This can be effective if you only have a few products but inefficient and time-consuming if you have a large inventory.
Create a Product Feed – You can do this by uploading a spreadsheet file that contains all the key details about your products. Alternatively, you can use the Merchant Center Content API to transfer your product data from another existing database like your website or a third-party service like Sellbrite.
These are the data points you must specify and optimize in your spreadsheets and/or product feed management tool:
- Product Title
- Product Type
- Description
- Product Category
- Global Trade Item Number (GTIN)
Product Feed Optimization Tips
As we mentioned earlier, with Google Shopping ads you don’t actively bid on your keywords. Instead, Google crawls your feed and your product details and decides what keywords your products are relevant for.
The data stored in your feed will power everything else on Google Shopping, including what search queries trigger your ads, where they are displayed, and which details are displayed. To put it even more plainly: Google Shopping ads depend on your Google shopping feed. That’s why following best practices and optimizing key elements of your feed is crucial for the success of your campaigns. Here are the most important elements:
1. Get specific in your product title
The title, along with the product image, is arguably the most important part of your feed. Your product title is what instantly communicates to shoppers what your product is. It also tells Google what your product is, so it knows when to show your product to searchers.
That means product titles should contain enough detail to attract shoppers and contain keywords your target audience is likely to search for. When crafting a product title you must include the actual name of the product as well as the top keyword that shoppers want to see, such as brand, color, size, model number, etc. For example:
Weak Title: Air Jordan for Men
Good Title: Air Jordan 1 Mid Light Gray Basketball Shoes
Note that there is a 150-character limit, and Google puts more weight on words that appear first in your title, so the sentence structure and word order should be considered carefully. If you’re using an automated feed tool you could create a rule that combines product name, brand, color, size, and more to form a strong and detailed product title.
A good formula would look like this:
Product+brand+keyword+extra specifications (waterproof, vegan-friendly, ethically sourced, etc)
2. What to avoid in your title
Now that you know the best practices for shopping ad titles, let’s talk about what you should not do. Your product title should be detailed and enticing, yet simple and straightforward. It is not a promotional space, nor a place to experiment with gimmicks.
A few things to avoid:
- Don’t put the price in the headline. Keep it in the dedicated prices attribute.
- Avoid symbols, HTML tags, and emojis. It will make your ad look spammy and unreliable.
- Resist the urge to write your title or parts of it in all caps.
- Don’t add promotional phrases like Limited Time Offer.
3. Optimize Your Images
Remember the only thing as important as the title is the images? Let’s face it, some shoppers won’t read a single word of your product description. You want to make sure your image is top-notch because they’ll base their click entirely on it.
Google prefers product images with plain white background, but images with the product in its intended setting can work too. Remember your images will appear in a thumbnail, so make sure none of the important features is cropped.
Another thing that Google values is quality. Hiring a professional to take product shots is definitely recommended, to avoid harsh shadows, wrong angles, etc. Better resolution images in the best light will convert better. You can find the complete version of Google’s requirements and recommendations here.
4. Include categories and sub-categories
For your product category, you’re choosing from Google’s taxonomy. This field is optional, but we strongly recommend that you fill it out. The category helps guide Google in understanding what your product is so it knows when to show it to shoppers.
Note that if you don’t set a [google_product_category] on your spreadsheet, Google will automatically assign a category to your products. It’s always better to keep matters under your control and assign your own categories.
Once you’ve set your category, it’s time to get granular with sub-categories. Those are important because they can reach niche interests in your target audience.
In this sense shopping ads are similar to search ads – broad targets aren’t as good as defined ones. The more refined your audience is, the more successful your ads will be.
Instead of
Apparel & Accessories > Clothing > Dresses
Go for
Apparel & Accessories > Clothing > Dresses> Summer Dresses > Floral
Using subcategories sets up your campaign for hierarchies. Google is a fan of those because they organize massive amounts of information. A hierarchical chart of types, categories, and subcategories will help you keep your Shopping feed data easily manageable and optimized.
5. Sale price annotations
If your product is on sale, Google will highlight this fact. To prevent merchants from taking advantage of this feature and keep them honest Google will require you to have a base price that you charged for at least 30 non-consecutive days in the last 200 days before there was a price drop.
The new sale price must be at least 5% less than the base price, but no more than 90% less.
6. Put your top keywords in the product type
The product type field is free-form, meaning you can do whatever you like with it. So why not take an opportunity when it’s handed to you? Use the long tail and short tail keywords you would like your products to be triggered by in the title, description, and most importantly the product type. That way, it will rank for relevant queries. Product type isn’t visible to shoppers, only to Google.
7. Add the right link
Your product link should redirect customers to your product page, not to your homepage. Note that there is also a mobile_link attribute. Take advantage of it!
If you have more than one image, use the additional_image_link attribute. While your main image should be as straightforward as possible, it would be a good idea to use more interesting angles for the additional ones. Do NOT, however, add any text or logos to your image.
A Few More Best Practices
1. Remove unprofitable ads
Not every ad will produce the results you hope for. It’s important to consistently measure performance and weed out the ads that don’t do well. That means that they get a ton of traffic but hardly any conversions or the ones that get really, really expensive conversions.
2. Use negative keywords
While you don’t get to bid on keywords in Google shopping you do have the opportunity to set negative keywords, and we recommend that you take advantage of it. This feature makes it so you don’t appear for certain search queries that are unrelated or irrelevant to your products.
If you see there is a lot of traffic on your page but poor conversion rates, it might mean you should take a look at your negative keywords. Setting the right ones can cut out a lot of traffic that lands on your page accidentally and eats away at your advertising budget.
3. Create ad groups
Ad groups help you see the bigger picture of your campaigns. They give you insight into whether some products perform well across various audiences and where there might be room for improvement.
For example, you can have an ad group for different types of shoes, such as boots, high heels, sandals, and sneakers. Then break it down even further into women’s boots, sandals, and sneakers. The deeper you subdivide your products the more data you can abstract about individual product ad performance.
4. Create remarketing lists
Retargeting lets you reach people who have visited your site before. They have already shown interest in your products, but for some reason left without making a purchase. Those users are already familiar with your brand, and research shows they are 70% more likely to convert than cold audiences.
Final Thoughts
Getting started with Google Shopping Ads will require some time and patience. To get the most out of it, you will need to pay attention to detail, but the effort is worth it. Product listing ads connect buyers and sellers in a very efficient way. Making them a must-have platform for eCommerce sellers.
Male sure your Shopping feed is consistently optimized, neat and tidy. If you follow best practices Google will essentially do the heavy lifting for you. And if you run into any kind of trouble, we’re happy to give you a hand!